")
We grow three crops on our farm that we consider “fringe vegetables”: the kind of veggies our chefs love (and even beg for), but can stump our most enthusiastic CSA members and vegetable loving farmers’ market customers. These are items that are well loved staples in Europe but usually expensive, less than fresh, and not regulars for most folks in the states.
These vegetables are fennel, radicchio, and celery. We continue to grow them despite their polarizing ways because we find them to be exceptionally flavorful and real powerhouse vegetables. We love helping our customers try and experience them, but promise they will be occasional items given only in smaller amounts.
Keep on scrolling to learn a little bit more about these vegetables, how to use them, and some recipes that will help you embrace them instead of shy away.


First up: fennel
Fennel is a beautiful vegetable common in Italian cooking and across the Mediterranean. It has a very distinctive bulb with layers like an onion, and a very unique, slightly flattened shape. Stalks shoot up from the bulb and there are wide, frilly fronds up top that resemble dill or carrot tops (because they are in the same botanical family).
Though many fear its flavor will be strong (probably because its aroma really is quite pungent), fennel does not have an overly assertive flavor. The leaves are more flavorful with the bulb being milder. It adds depth and a complex, anise-like flavor to whatever you’re cooking. If you’re wondering what that tastes like, note that Italian sausage, pepperoni, and many tomato sauces get their flavoring, at least in part, from fennel seeds.
Seasonality
Fennel can be planted in spring and harvested throughout summer and fall, but we grow it primarily in the fall. You can expect to see it at the market occasionally in summer and Fall September-November. It will appear in CSA shares around that time as well, usually given 1-2 times per season.
Storage
Fennel should be stored in the crisper drawer of your fridge, preferably in a plastic bag. It stores well in the fridge for a couple weeks, but the outer layer will dry out quickly. For best use, and so you don’t have to peel too much of the fennel bulb away, use within 3-4 days.
If the fronds are attached, use a knife to remove the stalks from the bulb and the fronds from the stalks. All should be stored in separate plastic bags and used first or preserved in a pesto and frozen for later use.
Using the whole plant
The part of the fennel typically used is the bulb. It can be used just like an onion: sliced, diced, chopped, minced, shaved, grilled, stewed, braised, or roasted. It’s great with brat kabobs, in German-style potato salad, shaved thinly on top of pizza, with pretty much any type of fish, alongside beets or carrots, and made into a herby slaw (try it with cilantro and/or apple for a real treat). The trickiest part about using the bulb is making sure the pieces are cut small enough (a big chunk of fennel is about as unappealing as a large chunk of raw onion) and knowing how to cut it. Here’s a great video to help with the latter.
Although it’s most common to use the bulb, all parts of the plant can be used. The fronds (the leafy parts) can be used similarly to dill: added to salads and slaws, used to garnish dishes and add flavor, or even to make a bright pesto or a compound butter for fish. If the fronds/leaves taste too strong for your liking, just discard them.
If the fennel is harvested young, the stalks will be tender and can be thinly sliced and used just like the bulb. But most often, the stalk will be tough and therefore only used in making stocks or however else you utilize aromatics like thyme, bay leaves, and mirepoix. Add it to your kettle or braising liquid to add flavor and then discard when the braise is finished.
If you need more ideas for fennel, see our favorite recipes below and also check out this great resource from A Couple Cooks that lists 10 Fantastic Fennel Recipes.
Our favorite fennel recipes
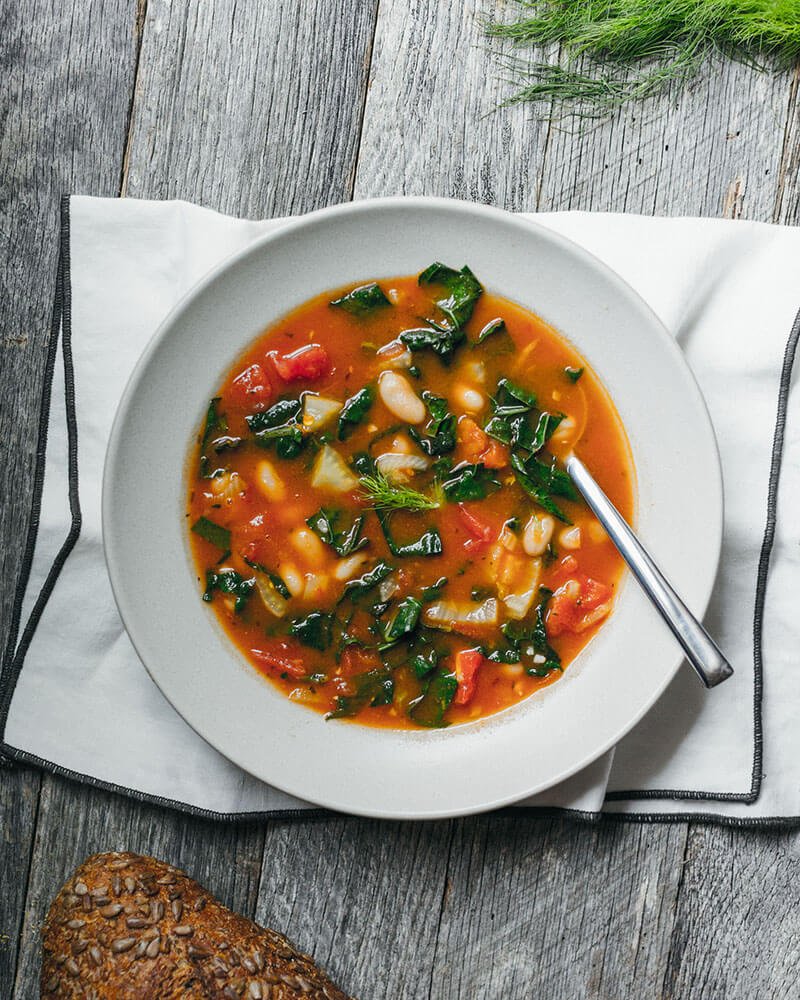
Tuscan Soup with White Beans
Recipe by A Couple Cooks
Yield: 6-8 servings
Time: 30 minutes
INGREDIENTS:
1 bulb fennel
2 bunches Tuscan kale or other dark leafy greens (Swiss chard, spinach, mustard greens)
2 15-ounce cans cannellini beans
2 tablespoons olive oil
2 28-ounce cans diced tomatoes (San Marzano, if possible)
4 cups vegetable broth (or canned broth)
2 cups water
½ teaspoon red pepper flakes
1 teaspoon dried basil
½ teaspoon smoked paprika
1 teaspoon kosher salt
Pecorino cheese to garnish (optional)
PREPARATION:
- Chop the fennel bulb (reserve some sprigs for a garnish). Wash and roughly chop the kale. Drain and rinse the cannellini beans.
- In a large pot or Dutch oven, heat the olive oil over medium high heat, then sauté the fennel for 5 minutes.
- Add the canned tomatoes with their juices and simmer for 8 minutes.
- Add the vegetable broth, water and cannellini beans. Bring to a boil.
- Reduce to a simmer and add the red pepper flakes, dried basil, smoked paprika, and kosher salt.
- Add the kale and simmer until tender, about 5 minutes. Serve garnished with grated Pecorino cheese and fennel sprigs. Store refrigerated for 3 days or frozen up to 3 months.

Easy Shaved Fennel Salad
Recipe by: The Modern Proper
Yield: 4 servings
Time: 10 minutes
INGREDIENTS:
2 fennel bulbs
1/4 cup extra virgin olive oil
1 tablespoon lemon zest
2 tablespoons lemon juice
1/2 teaspoon salt
1/4 teaspoon pepper
2 tablespoons fresh mint, roughly chopped
1/2 cup parmesan, optional
PREPARATION:
- In a small bowl mix together olive oil, lemon zest, lemon juice, salt and pepper. Set aside.
- Using a mandolin, shave fennel until almost translucent. Toss shaved fennel along with fresh mint, parmesan cheese and prepared lemon salad dressing.

Dill and Fennel Frond Potato Salad
Recipe by Food52
Yield: 6 side servings
Time: 30 minutes
INGREDIENTS:
6 large redskin potatoes
3/4 cup good quality mayo
1/2 cup sour cream
2 tablespoons minced fennel fronds
2 tablespoons minced fresh dill weed
1 teaspoon ground fennel seed
Juice of 1/2 lemon
1/2 teaspoon salt
1/2 teaspoon black pepper
2 tablespoons milk (any kind)
1 cup diced celery (small dice)
3 green onions/scallions thinly sliced
Additional mayo if needed
Additional salt and pepper for re-seasoning
PREPARATION:
- Steam or boil the potatoes in their jackets in water until fork tender. This could take between 15 and 20 minutes, depending on potato size.
- While the potatoes are cooking, make the dressing by combining the mayo, sour cream, fennel fronds, dill, ground fennel seed, lemon juice, salt, pepper and milk. Set aside or refrigerate.
- When the potatoes are done, drain them in a colander and then while still warm but cool enough to handle, peel them and then cut them in small chunks and place in a large mixing bowl.
- Gently stir in the celery and green onion and then start stirring in the dressing a little at a time. Depending on your potatoes you may not need all the dressing. You want a nice creamy consistency. If it’s too dry, stir in a little more mayo.
- Refrigerate for at least a few hours and when ready to serve, re-season with salt and pepper if you like.

Cucumber & Fennel Salad
Recipe by Big Daddy’s Farm
Yield: 2 servings
Time: 15 minutes
INGREDIENTS:
1 large cucumber, halved lengthways, deseeded and cut into thin half moons
1 teaspoon sugar
1 fennel bulb, finely sliced
1/2 cup reduced-fat sour cream
Juice 1 lemon
1 tablespoon white wine vinegar
Small bunch dill, roughly chopped
PREPARATION:
- Put cucumber in a fine mesh strainer. Sprinkle with 1 teaspoon salt and the sugar, then leave for 10 mins. Add fennel.
- Mix soured cream, lemon juice, vinegar and dill, then season with black pepper and add to fennel mix.


Next on the list: celery
We grow two different kinds of celery at our farm. The traditional headed celery you are familiar with from the grocery store as well as leaf celery (also referred to as cutting celery). Leaf celery resembles parsley and is harvested as leaves and put into bunches. You can consider a tender herb that tastes like celery and use it as such – this is only an item at fall markets and in late fall shares.
Celery grown in Wisconsin, even that grown in our high tunnels with lots of water and fertile soils, is much stronger in flavor than that grown in the sands of central California. This means it can have a stronger celery flavor. Celery lovers usually love summer Wisconsin celery for that summer, but celery haters need to work a little harder to temper the bold flavor. The flavor difference is pronounced in raw celery only and in cooked dishes you should see no difference.
Seasonality
Celery is a peak summer vegetable for us, beginning in late June with peak production in the months of July, August, and September. We will have it at farmers’ market frequently during that time period and aim to put it in CSA boxes 2-3 times during the summer season and a single time in fall.
Storage
Celery and leaf celery needs to be stored in the crisper drawer of the fridge, ideally in a plastic bag, and better yet, with a damp paper towel. Celery grows limp quickly in the fridge, so the more you can do to keep it well hydrated, the more crunchy it will stay. Use it within a couple days if the crunchiness is important to you otherwise, it will remain usable (though less crisp) for up to 2 weeks. You can easily chop and freeze celery if you are getting behind and use it in soups all year long.
Leaf celery can also be stored stems down in a glass of water. This is a great way to keep leafy herbs of all types hydrated if you have the room.
Using fresh Wisconsin celery
Again, if you love celery, you’re going to love the big bold flavor of Wisconsin celery. You can snack on it (with or without peanut butter or other dips), use it for salads (to enhance them or as the main flavor), and in fresh juices (again to enhance them or as the main/primary flavor).
Leaf celery or the leaves of traditional celery can also be used in salads and juices, the leaves can literally be tossed right into your base of greens. They work well finely chopped and used alongside parsley in many dishes as well.
If you don’t love the base flavor of celery, our biggest recommendation is to embrace the French tradition of mirepoix. Mirepox is a blend of celery, carrot, and onion sauteed in butter (usually) or some other fat to form a base for soups, stews, broths, and sauces. Cajun and Spanish cooking uses a similar concept for the base of all their cooking. It’s called the “holy trinity” and only differs in the fact that green sweet peppers replace carrots.
Here’s a few other ideas for less than enthusiastic celery receivers:
- Save it and add it to homemade stocks
- Pair it with other very strong flavors in a salad (there’s a reason celery salads often have blue cheese and dried cranberries in them)
- Make a gratin with it– there’s nothing a little cream, cheese, and breadcrumbs won’t fix. It is especially good paired with potatoes.
- Combine it with other carrot/celery family vegetables (like parsnips for example) and roast it
- Make the traditional Italian dish of braised celery in tomato sauce (a great way to pair celery’s strong flavor with other bold flavors)
- Whip up a waldorf salad
- Make a creamy pureed soup
- Stuffing, stuffing, stuffing- make yourself some stuffing also known as dressing!
Our favorite ways to enjoy celery

Cabbage Celery Slaw
Recipe by Lindo’s Group of Companies
Yield: 6 servings
Time: 20 minutes
INGREDIENTS:
1/3 cup pumpkin seeds
2 cups shredded napa cabbage
2 cups shredded savoy or green cabbage (use extra napa if you don’t have both)
1 cup arugula leaves
2/3 cup thinly sliced celery
2/3 cup thinly sliced green onions, including green leaves
1 1/2 tablespoons rice vinegar
1 tablespoon sugar
1 tablespoon soy sauce
1/2 teaspoon minced garlic
1/4 teaspoon toasted sesame oil
1/4 teaspoon freshly grated ginger
1/2 cup mayonnaise
Freshly ground black pepper
PREPARATION:
- Toast the pumpkin seeds in a skillet on medium high heat, stirring constantly, until puffed and golden. About 4- 5 minutes. Set aside.
- Combine cabbage, arugula, celery, and green onions in a large bowl.
- In a small bowl, whisk together rice vinegar, sugar, soy sauce, garlic, sesame oil, and ginger until sugar has dissolved. Add mayonnaise and whisk until completely combined.
- Gently toss the cabbage mixture with the pumpkin seeds and the dressing. Note: Use about half the dressing at first and toss. Season with a little freshly ground black pepper. Add more dressing until the salad is coated to your taste.

Chicken and Rice Soup With Celery, Parsley and Lemon
Recipe by NYTimes Cooking
Yield: 4-6 servings
Time: 40 minutes
INGREDIENTS:
8 cups chicken broth
1 pound boneless, skinless chicken thighs
4 stalks celery, leaves reserved and stalks thinly sliced
¾ cup jasmine rice (unrinsed)
Kosher salt
½ cup fresh parsley leaves
1 teaspoon fresh lemon zest plus up to 1/2 cup lemon juice (from 2 to 3 lemons)
1 small garlic clove
1 tablespoon unsalted butter (optional)
PREPARATION:
- In a large Dutch oven or pot, combine the broth, chicken, celery and rice. Season lightly with salt. (Some broths have more salt than others, so start easy.) Bring to a simmer over medium-high heat, then reduce heat and simmer until the chicken is cooked through and the rice starts to break down and lose its shape, 20 to 30 minutes.
- Meanwhile, finely chop together the parsley leaves, lemon zest and up to 1/2 cup celery leaves. Transfer to a small bowl, grate the garlic clove into the bowl, season with salt and stir to combine.
- Using tongs, remove the chicken from the pot and transfer to a medium bowl. Using two forks, shred the chicken into pieces, then stir it back into the soup. Remove from heat, stir in the butter (if using), and season to taste with salt. Stir in the lemon juice a little at a time until the soup is bright but still tastes like chicken. (You may not use the full 1/2 cup juice.)
- Divide the soup among bowls and top with the parsley-lemon mixture. (The soup, minus the lemon juice and parsley mixture, can be refrigerated for up to 3 days; the rice will absorb liquid as it sits, so add more chicken broth when reheating. Add the lemon juice and fresh herb garnish just before serving.)

Chicken and Celery Salad With Wasabi-Tahini Dressing
Recipe by NYTimes Cooking
Yield: 4-6 servings
Time: 1 hour
INGREDIENTS:
2 small boneless, skinless chicken breasts (about 1 pound total)
Kosher salt
¼ cup fresh lime juice, plus more lime wedges, for serving (3 to 4 limes)
¼ cup tahini
1 to 2 tablespoons wasabi paste
2 garlic cloves, grated
½ teaspoon granulated sugar
8 to 10 celery ribs, plus 1/2 cup celery leaves
Sesame seeds, for serving
PREPARATION:
- In a medium pot, cover chicken breasts with about 2 inches of water, and season with 2 tablespoons kosher salt. Bring to a boil over high heat, then simmer on low until the chicken is cooked through, about 20 minutes. Once the chicken is cooked, remove it from the pot and let cool.
- While the chicken cools, make the dressing: In a medium bowl, whisk together lime juice, tahini, wasabi paste, garlic, sugar and 1/4 cup water until smooth. Season to taste with salt.
- Cut celery into 2-inch segments, then cut segments lengthwise into matchsticks and place in a large bowl.
- Using two forks or hands, shred the chicken into bite-size pieces and transfer to the bowl with the celery.
- Pour dressing over the chicken and celery and toss to coat. Top with celery leaves and sesame seeds, and serve with lime wedges.

And finally: radicchio
Radicchio is a bitter, yep I said it, Italian vegetable. It’s a member of the chicory family and there are several different types and varieties. We grow the round, cabbage-like type at our farm, and harvest it in the fall because it sweetens in the cold weather.
Seasonality
At our farm, peak radicchio season is September- November (sometimes going as late as December depending on the weather). Farmers’ market fans can expect it on market stands during this window. Summer CSA members can expect it 1 time in their late season boxes. Occasionally, fall CSA members will receive it as well.
Storage
Radicchio should be stored in the crisper drawer of your fridge, preferably in a plastic bag. It should store well for at least a week that way.
How we eat it
It is a stunningly beautiful vegetable, but the flavor goes beyond what our Midwestern palates are used to. Bitter isn’t a flavor profile we are used to. That said, as with many new flavors, eating it over and over (approximately 7 times) will make you much more likely to love it. This worked for my kids in learning to like this new vegetable, as did blending it with other leafy greens like spinach and lettuce. Paired with butterhead lettuce it offers a balanced flavor.
Luckily, there are many ways to temper this bitterness. First, you should know that cutting radicchio is one way to release some of the bitterness from the head. Cut your radicchio in half and finely shred it on the diagonal to sweeten up the green a bit. Soaking it in ice cold salt water is another way to reduce the amount of bitterness. Just drain, spin, and mix it with other sweet greens (and/or citrus and apple). Dressing your salad in advance will also help to minimize the bitterness a bit.
Another option with radicchio is to embrace the bitter by roasting it and pairing with sweet and sour (think maple balsamic), citrus, or creamy dressings.
If you need more ideas, we’ve got some of our favorite recipes below. Food52 also created an excellent resource that shares 11 favorite ways to use radicchio.
A few radicchio recipes

Apple and Radicchio Salad with Walnut Vinaigrette
Recipe by In Fine Balance
Yield: 10 servings
Time: 15 minutes
INGREDIENTS:
For the dressing:
3 tablespoons juice from fresh squeezed clementines about 2
3 tablespoons walnut oil
1 tablespoon red wine vinegar
2 teaspoons Dijon Mustard
1 teaspoon honey or agave syrup to keep it vegan
¼ teaspoon ground black pepper
a healthy pinch of salt
For the salad:
1 small head of radicchio thinly sliced
1 small head of boston lettuce thinly sliced
1 cup thinly sliced radishes
2 Granny Smith apples cut into julienne strips
½ cup coarsely chopped walnuts toasted
PREPARATION:
- In a mason jar or other container with an air-tight lid, add all ingredients for the dressing. Secure lid and shake well until combined. Taste for salt and adjust if needed.
- Toss all salad ingredients into a large salad bowl. Toss with vinaigrette and divide between serving plates and sprinkle each plate with chopped walnuts. Alternatively, toss all items together in a large serving bowl with vinaigrette and walnuts and serve buffet style.

Radicchio Salad With Caramelized Carrots and Onions
Recipe by Epicurious
Yield: 1 hour
Time: 8-10 servings
INGREDIENTS:
1/2 cup sliced almonds
2 pounds carrots, cut into 4×1/2″ sticks
1/2 cup olive oil, divided
2 tablespoons thyme leaves, divided
2 3/4 teaspoons kosher salt, divided
1/2 teaspoon crushed red pepper flakes, divided
2 medium red onions, cut into 1/2″ wedges
2 garlic cloves, finely grated
2 tablespoons plus 1 teaspoon sherry vinegar
2 tablespoons fresh orange juice
1 tablespoon honey
1 large or 2 small heads radicchio (about 11 ounces), leaves separated and cut into medium pieces
4 oranges, peeled, sliced into 1/2″ half moons
2 cups parsley leaves
PREPARATION:
- Preheat oven to 350°F. Toast almonds on a rimmed baking sheet, tossing halfway through, until golden brown, 8–10 minutes; set aside.
- Cook carrots, 2 Tbsp. oil, 1 Tbsp. thyme, 1 tsp. salt, 1/4 tsp. red pepper, and 1 cup water in a large skillet over medium-high heat, stirring occasionally, until water is evaporated, about 15 minutes. Continue to cook, stirring occasionally, until carrots are lightly browned and tender, about 5 minutes more.
- Meanwhile, heat 2 Tbsp. oil in another large skillet over medium-high. Add onions, 1 tsp. salt, and remaining 1 Tbsp. thyme and 1/4 tsp. red pepper and cook, stirring occasionally, until onions are lightly browned and tender, 10–12 minutes.

Radicchio Salad with Sour Cream Ranch
Recipe by Bon Appetit
Yield: 8 servings
Time: 20 minutes
INGREDIENTS:
⅓ cup sour cream
⅓ cup plain whole-milk Greek yogurt
1 tablespoon plus 1½ tsp. sherry vinegar or apple cider vinegar
5 garlic cloves, 1 finely grated, 4 crushed
1 teaspoon honey
8 tablespoons extra-virgin olive oil, divided
Kosher salt
2 scallions, thinly sliced
½ cup panko (Japanese breadcrumbs)
½ lemon
2 medium radicchio, preferably Castelfranco, leaves separated
PREPARATION:
- Mix sour cream, yogurt, vinegar, grated garlic, honey, and 5 Tbsp. oil in a small bowl; season dressing with salt.
- Heat remaining 3 Tbsp. oil in a medium skillet over medium. Add crushed garlic and scallions and cook, stirring often, until golden brown around the edges, about 4 minutes. Add panko and season with salt. Cook, stirring often, until golden brown, about 3 minutes. Finely grate lemon zest directly into pan and toss a few times to incorporate. Transfer breadcrumbs to paper towels to drain; let cool. Taste and season with more salt if needed.
- Place radicchio in a large bowl. Drizzle with dressing; toss gently to coat. Season with salt and scatter breadcrumbs over.
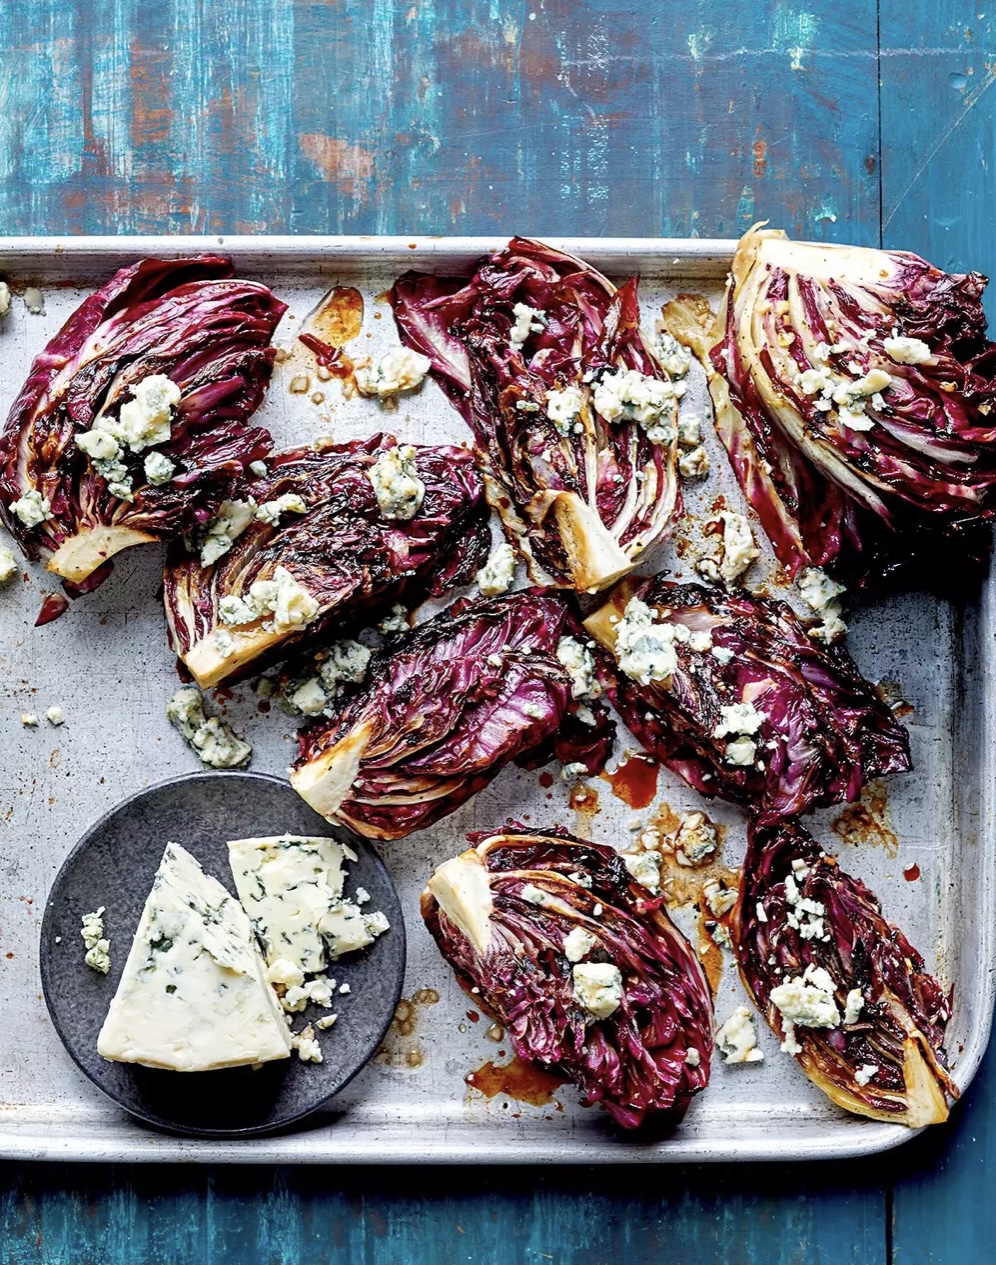
Grilled Radicchio with Cheese
Recipe by Better Homes & Garden
Yield: 8 wedges
Time: 1 hour, 10 minutes
INGREDIENTS:
2 heads radicchio, trimmed and quartered, leaving stem ends intact
⅓ cup white balsamic vinegar
¼ cup olive oil
4 cloves garlic, minced
¼ teaspoon salt
¼ teaspoon ground black pepper
½ cup crumbled blue cheese or feta (2 oz.)
PREPARATION:
- Place radicchio in a large resealable bag set in a shallow dish. For marinade: In a small bowl whisk together vinegar, oil, garlic, salt, and black pepper. Pour over radicchio. Seal bag, turning to coat. Chill 1 to 2 hours. Drain, reserving marinade.
- Grill radicchio on the rack of a covered grill directly over medium 8 to 10 minutes, turning occasionally until each side is lightly charred. Turn wedges cut sides up; sprinkle with cheese. Grill 2 to 3 minutes more or until cheese is softened. Drizzle with reserved marinade.
Leave a Reply
You must be logged in to post a comment.